English Version.
Turns out that I have a MPU6050 (Accelerometer + Gyro sensor) and these days I have gone through the process of learning how to use it.
If everything goes well, on this post you will find practical information to configure, calibrate and use this sensor.
My “contribution” consists in the development of a brief script for Matlab that is able to get and use the information extracted from the sensor.
Like always the code, the necessary links to the Arduino sketches and a demo video will be attached in case you want to reproduce some of the steps… Video? Did someone say “video”?
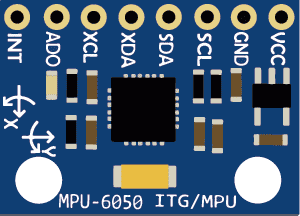
MPU6050 is a little breakout board that includes a 3-axis accelerometer and a 3-axis gyroscope and an I2C communication module (with two addresses available). It can be used among other things to measure accelerations and angles, somethig that can be of interest if you like to build mini-robots. A more detailed information can be found on Arduino Playground.
Connection
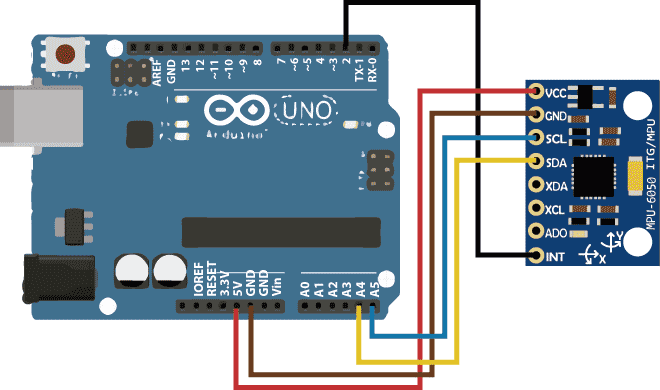
The standard MPU6050-Arduino connection comprises only VCC, GND, SCL and SDA pins although some sketches require also pin INT. The connection with Arduino UNO follows the next scheme.
Libraries
Before starting with the fun, it is necessary some boring preparatory work regarding the needed libraries.
Firstly, you have to download (and “install”) two libraries: I2Cdevlib and MPU6050. The former solves issues related to the communication while the latter includes some useful functions to configure and operate the sensor. Both libraries can be downloaded from HERE. The installation process is as easy as copying both folders within the Arduino IDE installation path (typically c:/Program Files (x86)/Arduino/libraries).
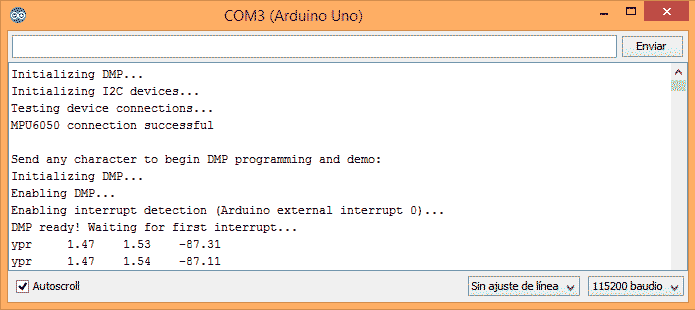
There are several things you can do to check that everything works fine, e.g., you can use one of the MPU6050 example sketches: Arduino IDE – File – Examples – MPU6050 – MPU6050_DMP6. This sketch checks out the connection, initializes the device and implements a loop where the accelerations and angle rates are continuously broadcasted. If everything went ok, you should see some messages on the serial monitor (notice that the sketch uses a baudrate of 115200).
Calibration
If the above sketch worked for you, we are ready to continue. The next typical step is calibrating the sensor.
This kind of sensors uses to present some offsets in the measures that depend on the manufacturing process of each device and thus, in principle it is unique for each device. The sketch you have just tested have a set of lines (around line #200) where some offset values are introduced in order to correct the data registered. However for that “correction” to be useful, you need the offsets of your particular sensor.
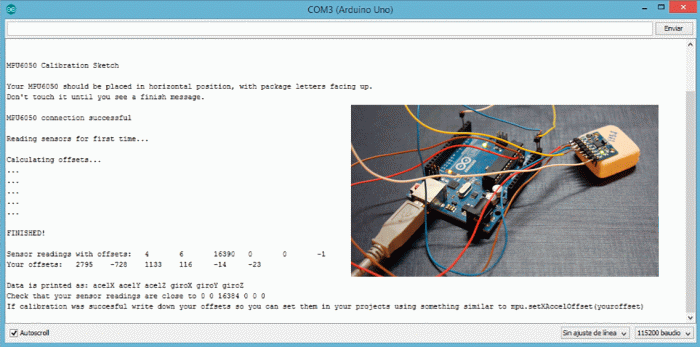
On i2cdevlib, there is a sketch MPU6050_Calibration_v1.1.zip that really eases the task. You only have to upload it, open a serial monitor, place the sensor as horizontal as possible and wait. At the end of the process you will see something similar to the next screenshot.
TEAPOT demo
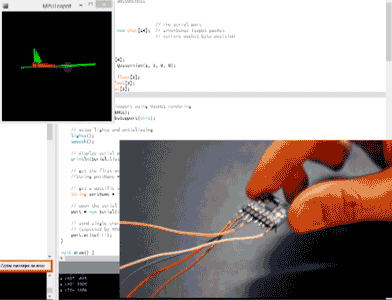
The code used before to test that everything was ok hides an interesting demo: teapot demo. It consists basically in a 3D representation of something similar to a plane whose position changes with the sensor orientation. To run it, you have to do a couple of things before.
First you have to comment line 100 in the sketch:
//#define OUTPUT_READABLE_YAWPITCHROLL
and uncomment line 117:
#define OUTPUT\_TEAPOT}
This changes the code behavior. Besides, you need to install Processing and to add toxi library. The library installation process is as simple as downloading the library and placing it in the libraries subdirectory of the processing path, which usually is on UserName/Documents/processing/libraries.
Subsequently, on processing, open the processing file MPUTeapot from ArduinoIdePath/libraries/MPU6050/Examples/MPU6050_DMP6/Processing/MPUTeapot.
Now, if you upload the sketch to Arduino and run the file on processing, you will see something similar to that:
If this worked for you, that means you are ready to fly, and to develop your own applications with this low-cost sensor.
Having fun with Matlab
Given the information that this sensor provides, as far as I am concerned, its integration together with Matlab would be a great deal interesting. To do that, I decided to “reproduce” the teapot demo in Matlab. I basically modified slightly the Arduino sketch used before (DMP6) to broadcast only the angles. Afterwards, I coded a Matlab script that reads asynchronously the serial port, extracts the angles and uses them to plot a 3d-cube in the measured orientation.
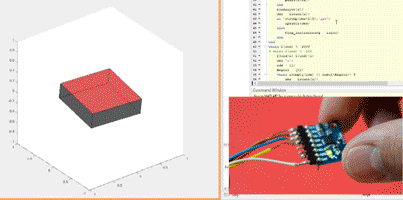
It is worth noting that, since the broadcasting of the sensor is likely to be faster than the loop implemented on Matlab, the serial port has to be asynchronously read. I found some possible solutions to that task on mathworks.
The End
Aaaand that is. All the sketches and scripts used through the posts can be downloaded from HERE. I expect to use this matlab-MPU6050 connection for some mini-projects in the future and, as you can imagine, I have the firm intention of posting them. Up to them, I leave you alone 🙂 . If you found useful the information here gathered, push like! share! or whatever!
See you soon.


Pingback: Arduino – MPU6050 | Turns Out That